KNX Gateway Configuration
This node connects to your KNX gateway, whether it is an IP interface/router or a TP/FT1.2 serial adapter.
General
| Property | Description |
|---|---|
| Name | Node name. |
| Gateway | Type the KNX/IP address/hostname or a serial path (for example /dev/ttyUSB0). You can also use the dropdown to pick a discovered KNX/IP gateway or an FT1.2 serial port: when selecting a serial entry the protocol switches to Serial FT1.2 and the UART defaults are applied automatically. |
Configuration
| Property | Description |
|---|---|
| Gateway port | Default is 3671. Not used for Serial FT1.2 connections. |
| Connection protocol | Tunnel UDP is for KNX/IP interfaces, Multicast UDP is for KNX/IP Routers, Serial FT1.2 is for TPUART/TP interfaces (selected automatically when you pick a serial port). Leave Auto to infer the right transport from the address. |
| Serial FT1.2 mode | Choose how the FT1.2 serial interface is initialised: KBerry/BAOS enables the Weinzierl KBerry/BAOS helper sequence (reset, BAOS link-layer mode, no GA filter), while Standard FT1.2 keeps a generic FT1.2 adapter without KBerry-specific steps. Default is KBerry/BAOS. |
| KNX Physical Address | The physical KNX address, example 1.1.200. Default is “15.15.22”. |
| Bind to local interface | The Node will use this local interface for communications. Leave “Auto” for automatic selection. If you have more than one lan connection, for example Ethernet and Wifi, it’s strongly recommended to manually select the interface, otherwise not all UDP telegram will reach your computer, thus the Node may not work as expected. Default is “Auto”. |
| Automatically connect to KNX BUS at start | Auto connect to the bus at start. Default is “Yes”. |
| Secure credentials source | Choose how KNX Secure data is supplied: ETS keyring file (Data Secure keys - and tunnelling credentials if present - come from the keyring), Manual credentials (only KNX IP Tunnelling Secure with a manually entered user), or Keyring + manual tunnel password (Data Secure keys from the keyring while the secure tunnel uses the manual user/password). Remember that KNX Data Secure telegrams always require a keyring file. |
| Tunnel interface individual address | Visible whenever the selected mode includes manual credentials (Manual or Keyring + manual tunnel password). Optional KNX individual address for the secure tunnel interface (for example 1.1.1); leave empty to let KNX Ultimate negotiate it automatically. |
| Tunnel user ID | Visible when manual credentials are used. Optional KNX Secure tunnel user identifier defined in ETS. |
| Tunnel user password | Visible when manual credentials are used. Password of the KNX Secure tunnelling user configured in ETS. |
KNX Secure essentials
• KNX Data Secure protects group-address telegrams and always needs a keyring file containing the group keys.
• KNX IP Tunnelling Secure protects the connection handshake with a commissioning password. Depending on the selected mode, the password can come from the keyring or be entered manually.
• KNX/IP Secure (tunnel handshake) applies only to IP transports (Tunnel TCP / secure routing). KNX Data Secure protects group-address telegrams and can be used both on IP (tunnelling/routing) and on TP via Serial FT1.2 when an ETS keyring is provided.
Advanced
| Property | Description |
|---|---|
| Suppress repeated (R-Flag) telegrams fom BUS | Ignore repeated KNX telegrams coming from the bus. Default is unchecked. |
| Suppress ACK request in tunneling mode | Enable it if you have a very old KNX/IP gateway. It ignores the ACK procedure and accepts all telegrams. Default is unchecked. |
| Enable flow bubbles plugin | Draw a small coloured bubble next to each KNX Device node in the editor. The bubble reflects the latest live state received from the gateway and becomes dim when the data is stale. Useful during commissioning and debugging. Default is unchecked. |
| Delay between each telegram (in milliseconds) | KNX specs states, that the maximum telegram sending speed is 50 telegrams per second. A speed between 25 and 50ms should be fine, unless you’re connecting to a remote KNX Gateway via a slow internet connection (in this case, you should increase the value by, for example, 200 to 500ms or more). |
| Loglevel | Log level, in case you need to debug something with the dev. Default is “Error”, |
| Node status throttle | Delay how often node badges are refreshed. When a delay is selected, intermediate status changes are discarded and the last one is shown after the chosen interval. Select Immediate to keep the legacy real-time behaviour. |
| Status date/time format | Choose how the timestamp is shown in node status badges (useful when the host OS locale cannot be configured). |
| Custom format | Used when Custom (tokens) is selected. Tokens: YYYY, YY, MMM, MM, DD, HH, mm, ss, A, a, Z. Use [text] for literals. |
| Locale override | Optional locale (BCP47), e.g. en-GB or it-IT. Used for month names (MMM) when Custom is selected. |
ETS file import
| Property | Description |
|---|---|
| If Group Address has no Datapoint | If a group address doesn’t have a datapoint, it allow to choose wether to stop import, import quth a fake datapoint of 1.001 or to skip import of that group address |
| ETS group address list | Use this section to import your ETS CSV or ESF file. You can either paste the CSV or ESF file content or set the file path, for example ./pi/homecsv.csv. Please refer to the help links for further infos. |
Utility
| Property | Description |
|---|---|
| Gather debug info for troubleshoot | Please click the button and add it to the gitHub issue you want to open, it will help me a lot to helping you. |
| Get all used GA for KNX routing filter | Press READ to retrieve a plain text list of all group address belonging to this gateway, that has been used in the flows. You can use this list to populate your KNX/IP router filter table. |
WORKING WITH THE ETS CSV OR ESF FILE

Instead of create a knx-ultimate node for each Group Address to control, you can import your ETS csv group addresses file or, starting from V 1.1.35, an ESF file as well (If, for example, you only have ETS Inside). Supported ETS versions: ETS 4 and onwards.
Starting from version 1.4.18, you can also simply enter the path to the file in this field (e.g.: /home/pi/mycsv.csv).
Thanks to that, the knx-ultimate node where you selected Universal mode (listen to all Group Addresses) , becomes an universal input/output node, aware of all Datapoints, Group Addresses and Device’s name (ex: Living Room Lamp). Just send the payload to the knx-ultimate node, and it’ll encode it with the right datapoint and send it to the bus. Likewise, when the knx-ultimate node receives a telegram from the bus, it outputs a right decoded payload using the datapoint specified in the ETS CSV or ESF file.
Starting from Version 1.1.11, you can use Universal mode (listen to all Group Addresses) option without the need of an imported ETS CSV or ESF File. You need to pass a message to the node, containing datapoint type and a value. As soon as the node receives a telegram from KNX Bus, it will output a RAW value and beside that, it will try to decode the value without knowing the datapoint type. Note: ETS CSV Group address exported file is way the best option, because it contain a precise datapoints with subtype. ETS ESF exported file is simpler and it doesn’t have the subtype.
If you can use both, please prefer the ETS CSV Group address exported file, because the ESF can lead to a false output values. Please manually check and eventually adjust the datapoints each time you import the ESF file. From version 1.4.1 you can import group addresses also at runtime, via msg, using the WatchDog node.
You can work with a mix of knx-ultimate nodes, some with Universal mode (listen to all Group Addresses) checked and some not. You are absolutely free!
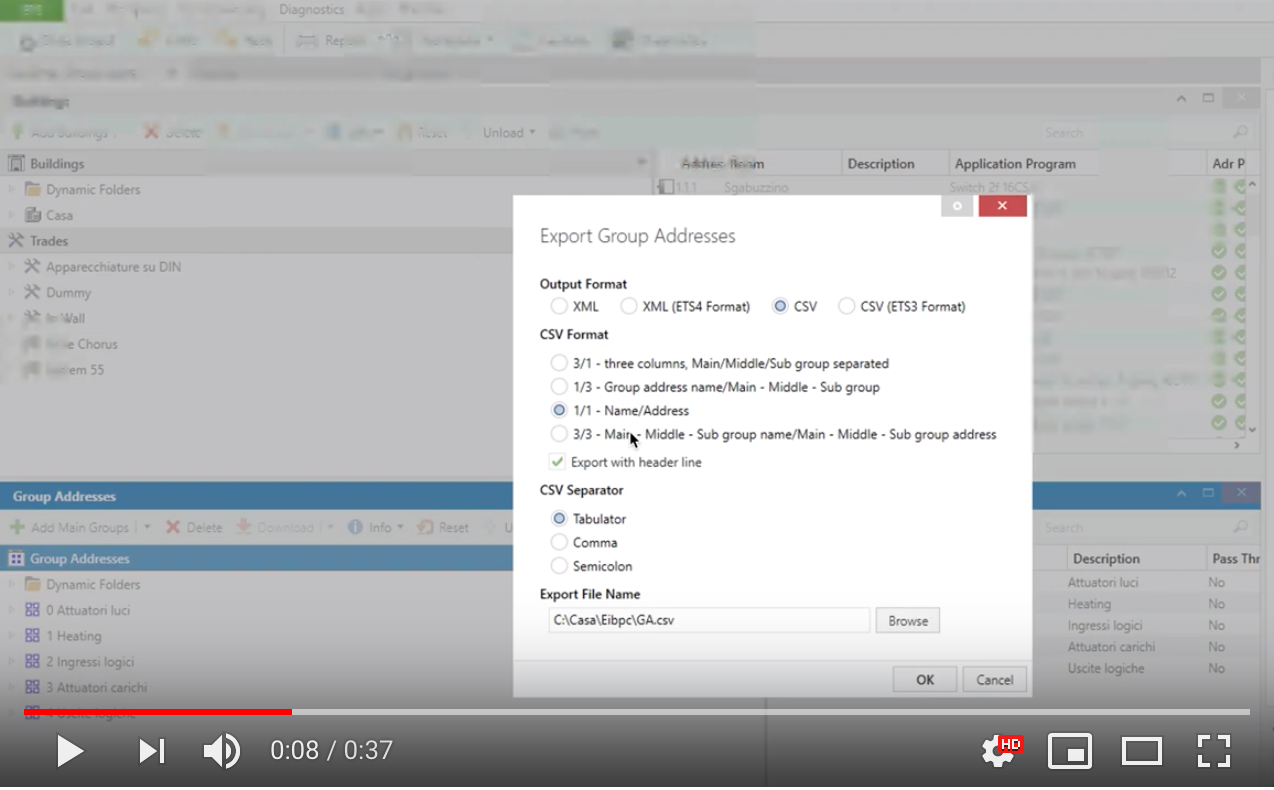
- ETS CSV Group Addresses List import ATTENTION: THERE MUST NOT BE TABULATION CHARACTERS IN THE NAME OF THE GROUP ADDRESS If Group Address has no Datapoint > If a Group address has no Datapoint set in the ETS, you can select to stop and abort the entire import process, to skip the affected group address, or to add the the affected Group Address with a fake datapoint and continue import. How to export the ETS -> CSV <- Group Addresses List
On ETS, click the group addresses list, then right click, then select ‘export group addresses’. On the export window, select these options:
Output Format : CSV
CSV Format : 1/1 Name/Address
Export with header line : checked
CSV Separator : Tabulator.
Then paste the file content here.
Note that the ETS CSV FILE must contain the Datapoints for each Group Address.
The node parses your ETS CSV FILE prior to use it and will tell you the results in the DEBUG TAB of Node-Red page.
The result can be of two types: ERROR and WARNING
ERROR occurs when a Datapoint is not specified for a Group Address. This is a critical error and stops the process of importing the ETS CSV FILE.
WARNING occurs when a Datapoint’s subtype is not specified. In this case the node parser will append a default one, but warns you that you shoult watch and correct the Datapoint, by adding a subtype. A Subtype is the number staying at the right of the “.” in a Datapoint (ex: 5.001).
Note: the fields must be surrounded by “ For example:
“Attuatori luci” “0/-/-“ “” “” “” “” “Auto”
How to export the ETS -> ESF <- Group Addresses List
On ETS window, select your project, then click the export icon (the icon with the up arrow)
Select to export the project in ESF format (not the default .knxprod)
Then copy the file content and paste it into the gateway config “ETS group address list” field.