KNX Gateway 配置
该节点用于连接你的 KNX/IP 网关。
常规
| 属性 | 说明 |
|---|---|
| Name | 节点名称。 |
| Gateway | 填写 KNX/IP 网关的 IP/Hostname,或直接输入串口路径(例如 /dev/ttyUSB0)。在下拉列表中也会显示已发现的 KNX/IP 网关及 FT1.2 串口;选择串口时会自动切换到 Serial FT1.2 并套用推荐的 UART 参数。 |
配置
| 属性 | 说明 |
|---|---|
| 端口号 | 端口,默认 3671。串口模式下不使用。 |
| 连接协议 | Tunnel UDP 适用于 KNX/IP 接口,Multicast UDP 适用于 KNX/IP 路由器,Serial FT1.2 适用于 TP/FT1.2 串口(选择串口时自动切换)。 Auto 会尝试自动选择合适的协议。 |
| Serial FT1.2 模式 | 定义如何初始化 FT1.2 串口接口:KBerry/BAOS 启用 Weinzierl KBerry/BAOS 专用初始化序列(复位、BAOS 链路层模式、无 GA 过滤),而 Standard FT1.2 则按通用 FT1.2 适配器处理,不执行 KBerry 特定步骤。默认为 KBerry/BAOS。 |
| KNX 物理地址 | 物理地址,如 1.1.200。默认 15.15.22。 |
| 绑定到本地接口 | 使用的本地网络接口。”Auto” 自动选择。若有多网卡(以太网/无线),建议手动指定,避免 UDP 丢包。 |
| 在启动时自动链接到KNX总线 | 启动时自动连接总线。默认 “Yes”。 |
| 安全凭据来源 | 选择如何提供 KNX Secure 数据: ETS 密钥环文件 ** (Data Secure 密钥及(若存在)隧道凭据来自密钥环)、手动凭据 ** (仅启用 KNX IP 安全隧道,手动输入用户)或密钥环 + 手动隧道密码 (Data Secure 由密钥环提供,隧道用户/密码手动输入)。注意:KNX Data Secure 报文始终需要密钥环文件。 |
| 隧道接口个人地址 | 当所选模式包含手动凭据时显示(手动凭据或密钥环 + 手动隧道密码)。可选的安全隧道 KNX 个人地址(如 1.1.1);留空则由 KNX Ultimate 自动协商。 |
| 隧道用户 ID | 启用手动凭据时显示。可选的 KNX Secure 隧道用户 ID(在 ETS 中配置)。 |
| 隧道用户密码 | 启用手动凭据时显示。输入 ETS 中配置的 KNX Secure 隧道用户密码。 |
KNX Secure 概览
• KNX Data Secure 用于保护组地址报文, 始终 需要包含组密钥的密钥环文件。
• KNX IP Tunnelling Secure 通过调试密码保护连接握手,密码可根据模式从密钥环读取或在界面中手动输入。
• KNX/IP Secure(隧道握手)仅适用于 IP 传输(Tunnel TCP / 安全路由)。KNX Data Secure 用于保护组地址报文,可在 IP(隧道/路由)和 TP(通过串口 FT1.2)上使用,只要提供 ETS 导出的 keyring 文件。
高级
| 属性 | 说明 |
|---|---|
| Suppress repeated (R-Flag) telegrams fom BUS | 忽略来自总线的重复报文(R 标志)。 |
| Suppress ACK request in tunneling mode | 适用于非常老的 KNX/IP 网关:忽略 ACK 流程并接受所有报文。 |
| 启用 flow bubbles 插件 | 在编辑器中为每个 KNX Device 节点显示一个小的彩色气泡。该气泡反映从 gateway 收到的最新实时状态,当数据过旧时会自动变淡。适合在调试和现场调试时快速观察状态。默认未启用。 |
| Delay between each telegram (ms) | KNX 规范最多 50 报文/秒。一般 25-50ms 合适;若经慢速网络远程连接,建议提高到 200-500ms。 |
| Loglevel | 日志级别(调试用)。默认 “Error”。 |
| 节点状态节流 | 设置状态徽章的刷新频率。启用延时后,中间状态会被丢弃,只在所选间隔后显示最后一次状态。选择 立即 可以保持实时显示。 |
| 状态日期/时间格式 | 选择状态徽章中日期/时间的显示方式(当系统区域设置无法配置时很有用)。 |
| 自定义格式 | 仅在选择 自定义(标记) 时使用。支持标记:YYYY, YY, MMM, MM, DD, HH, mm, ss, A, a, Z。使用 [文本] 表示字面量。 |
| 区域设置覆盖 | 可选(BCP47),例如 zh-CN、en-GB。在自定义格式中用于月份名称(MMM)。 |
ETS 文件导入
| 属性 | 说明 |
|---|---|
| If Group Address has no Datapoint | 当某组地址无 DPT 时:停止导入、跳过该 GA,或使用占位 DPT 1.001 继续。 |
| ETS group address list | 在此粘贴 ETS 导出的 CSV/ESF 内容,或填写文件路径(如 /home/pi/mycsv.csv)。详见帮助链接。 |
工具
| 属性 | 说明 |
|---|---|
| Gather debug info for troubleshoot | 点击按钮收集信息并附在 GitHub issue 中,便于排查。 |
| Get all used GA for KNX routing filter | 点击 READ 获取此网关在各流程中使用的全部 GA 列表,用于配置路由器过滤表。 |
使用 ETS CSV 或 ESF 文件
与其为每个 GA 建一个节点,不如导入 ETS 组地址:推荐 CSV;ESF(v1.1.35 起)也支持(如 ETS Inside)。支持 ETS 4+。
自 v1.4.18 起,可直接在字段中填写文件路径(如 /home/pi/mycsv.csv)。
启用 Universal mode (listen to all Group Addresses) 后,该节点成为通用 I/O:了解 DPT、GA 与设备名。向节点发送 payload 时,它按正确 DPT 编码并发送;从总线接收时,按 ETS 中的 DPT 解码输出。
自 v1.1.11 起,即使没有 ETS 也可使用通用模式:通过消息提供 DPT 和数值。收到总线报文时,同时输出 RAW,并尝试在未知 DPT 下解码。
注意:CSV 含精确 DPT 及子类型;ESF 不含子类型。若两者皆可,请优先 CSV;ESF 可能导致数值错误。导入 ESF 后请校对 DPT。自 v1.4.1 起可通过 WatchDog 在运行时导入。
视频: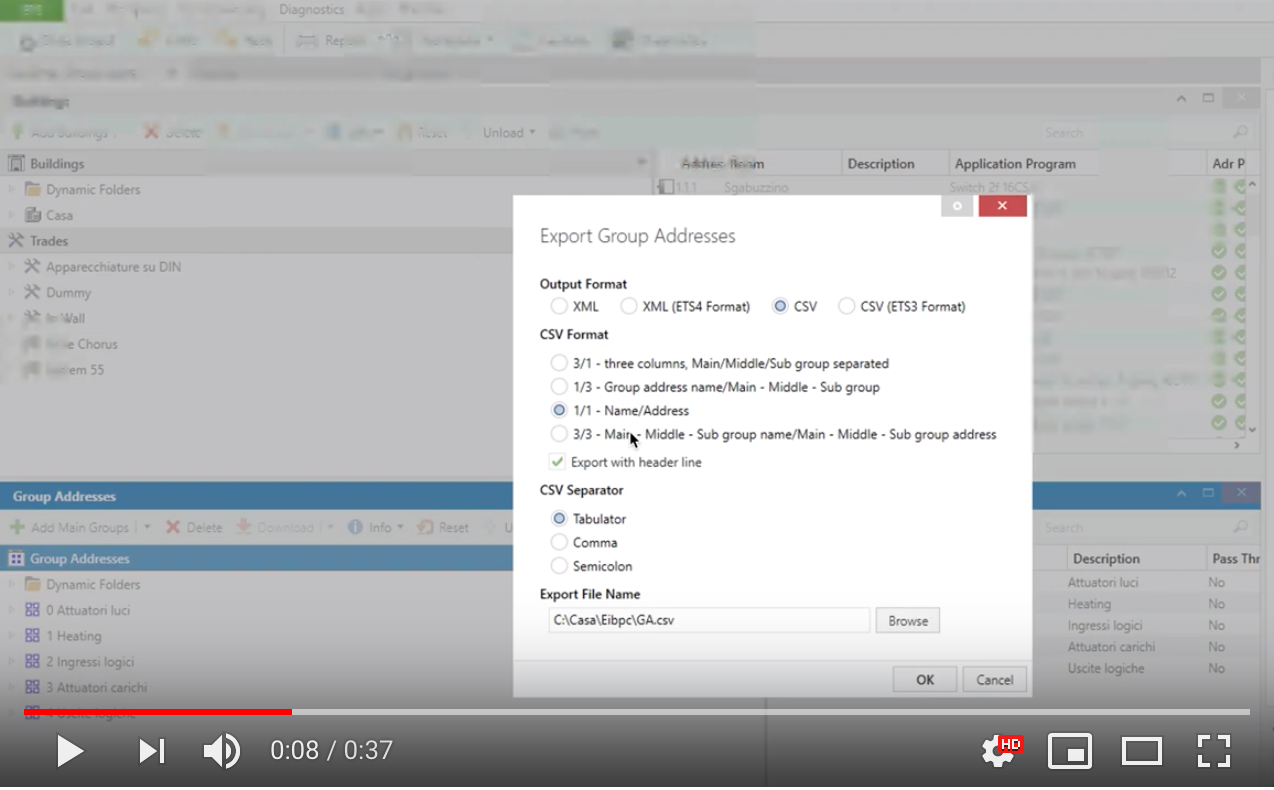
- 导入 ETS CSV 组地址 ** 注意:GA 名称中不得包含制表符(Tab)。If Group Address has no Datapoint ** > 若 ETS 中 GA 无 DPT:可停止导入、跳过该 GA、或使用占位 DPT 继续。如何从 ETS 导出 CSV
在 ETS 中选中组地址列表 → 右键 → 导出组地址;导出选项:
Output Format: CSV
CSV Format: 1/1 Name/Address
Export with header line: 勾选
CSV Separator: Tabulator
然后将文件内容粘贴到此处。文件必须包含每个 GA 的 DPT。解析结果会显示在 Node-RED 的 DEBUG 面板。
结果类型: ERROR ** (缺少 DPT → 停止导入)与WARNING ** (缺少子类型 → 自动补默认,但需人工确认)。子类型是 DPT 中小数点右侧的数字,如
5.001。如何从 ETS 导出 ESF
在 ETS 的项目页点击导出(上箭头)→ 选择 ESF(不是
.knxprod)→ 将 ESF 内容粘贴到网关的 “ETS group address list” 字段。
<table style="font-size:12px">
    <tr><th colspan="2" style="font-size:14px">节点状态颜色说明</th></tr>
    <tr><td><img src="https://raw.githubusercontent.com/Supergiovane/node-red-contrib-knx-ultimate/master/img/greendot.png"></td><td>响应写报文</td></tr>
    <tr><td><img src="https://raw.githubusercontent.com/Supergiovane/node-red-contrib-knx-ultimate/master/img/greenring.png"></td><td>循环引用保护(<a href="https://supergiovane.github.io/node-red-contrib-knx-ultimate/wiki/Protections" target="_blank">查看页面</a>)</td></tr>
    <tr><td><img src="https://raw.githubusercontent.com/Supergiovane/node-red-contrib-knx-ultimate/master/img/bluedot.png"></td><td>响应应答报文</td></tr>
    <tr><td><img src="https://raw.githubusercontent.com/Supergiovane/node-red-contrib-knx-ultimate/master/img/bluering.png"></td><td>自动将节点值作为应答发送(<a href="https://supergiovane.github.io/node-red-contrib-knx-ultimate/wiki/-Sample---Virtual-Device" target="_blank">Virtual Device</a>)</td></tr>
    <tr><td><img src="https://raw.githubusercontent.com/Supergiovane/node-red-contrib-knx-ultimate/master/img/greudot.png"></td><td>响应读报文</td></tr>
    <tr><td><img src="https://raw.githubusercontent.com/Supergiovane/node-red-contrib-knx-ultimate/master/img/greyring.png"></td><td>RBE 过滤:未发送报文</td></tr>
    <tr><td><img src="https://raw.githubusercontent.com/Supergiovane/node-red-contrib-knx-ultimate/master/img/reddot.png"></td><td>错误或已断开</td></tr>
    <tr><td><img src="https://raw.githubusercontent.com/Supergiovane/node-red-contrib-knx-ultimate/master/img/redring.png"></td><td>因循环引用而禁用(<a href="https://supergiovane.github.io/node-red-contrib-knx-ultimate/wiki/Protections" target="_blank">查看页面</a>)</td></tr>
</table>